


J.D Nicholls
Founder at @marketx_ai | Digital nomad 🎒 | Mentor 👨🏫 | Speaker 🗣️ | Developer 👨💻 | Creator of @proyecto26 #opensource #developer
➕
🟰
- Open Source Contributor 👨💻
- Game developer (Hobby) 🎮
- Developer who loves UX 💫
- Chocolate lover 🍫
- Founding Full-Stack Engineer 👷
AT
WebGL/Canvas brought about an era of rich visualization on the web since Adobe Flash.
WebGL is a JavaScript-rendering API that offers high-performance 2D and 3D interactive graphics capability and GPU acceleration
However, WebGL has a steeper learning curve, so several frameworks have been built upon the API to ease the complications of working with it directly.
// https://www.shadertoy.com/view/MdXSzS
// The Big Bang - just a small explosion somewhere in a massive Galaxy of Universes.

void mainImage( out vec4 fragColor, in vec2 fragCoord )
{
	vec2 uv = (fragCoord.xy / iResolution.xy) - .5;
	float t = iTime * .1 + ((.25 + .05 * sin(iTime * .1))/(length(uv.xy) + .07)) * 2.2;
	float si = sin(t);
	float co = cos(t);
	mat2 ma = mat2(co, si, -si, co);

	float v1, v2, v3;
	v1 = v2 = v3 = 0.0;

	float s = 0.0;
	for (int i = 0; i < 90; i++)
	{
		vec3 p = s * vec3(uv, 0.0);
		p.xy *= ma;
		p += vec3(.22, .3, s - 1.5 - sin(iTime * .13) * .1);
		for (int i = 0; i < 8; i++)	p = abs(p) / dot(p,p) - 0.659;
		v1 += dot(p,p) * .0015 * (1.8 + sin(length(uv.xy * 13.0) + .5  - iTime * .2));
		v2 += dot(p,p) * .0013 * (1.5 + sin(length(uv.xy * 14.5) + 1.2 - iTime * .3));
		v3 += length(p.xy*10.) * .0003;
		s  += .035;
	}

	float len = length(uv);
	v1 *= smoothstep(.7, .0, len);
	v2 *= smoothstep(.5, .0, len);
	v3 *= smoothstep(.9, .0, len);

	vec3 col = vec3( v3 * (1.5 + sin(iTime * .2) * .4),
					(v1 + v3) * .3,
					 v2) + smoothstep(0.2, .0, len) * .85 + smoothstep(.0, .6, v3) * .3;

	fragColor=vec4(min(pow(abs(col), vec3(1.2)), 1.0), 1.0);
}Now WebGPU propels web computations and graphics into a new era, providing a more efficient and robust API. Soon, it will be the go-to method for rendering most GPU-powered content on the web.
npm install pixi.js @pixi/react --saveStories App
const App: React.FC = () => {
  // raf allows to automatically renders the stage on request animation frame.
  return (
    <div className="flex-1 flex items-center justify-center">
      <Stage
        raf={true}
        options={{
          backgroundColor: 0xffffff,
          autoDensity: true,
          antialias: true,
        }}
      >
      </Stage>
    </div>
  );
};

export default App;
The Stage in PixiJS is the root container that orchestrates the scene, holding and managing all visual elements within an application.
const App: React.FC = () => {
  // useState can detect if the component is unmounted (Dialogs)
  const [parentEl, setParentEl] = useState<HTMLDivElement>();
  const { size: parentSize, resize } = useElementSize<HTMLDivElement>({
    el: parentEl,
  });

  return (
    <div
      ref={(ref) => setParentEl(ref || undefined)}
      className="flex-1 flex items-center justify-center"
    >
      <Stage
        raf={true}
        options={{
          backgroundColor: 0xffffff,
          resizeTo: parentEl,
          autoDensity: true,
          antialias: true,
        }}
      >
      </Stage>
    </div>
  );
};

export default App;
The Hard Way is the Easy Way; coding.
export type ElementProps<T> = {
  ref?: MutableRefObject<T>;
  el?: T;
};

// A hook for getting the HTML element using refs or React state
export const useElement = <T extends HTMLElement>(props: ElementProps<T>) => {
  // get the Element using refs
  const ref = useCombinedRefs<T>(props.ref);
  // or get the element using React state
  const el = useMemo(() => props?.el || ref?.current, [ref, props.el]);

  // Update the ref when the element changes (When getting the element using React state)
  useEffect(() => {
    if (props?.el && ref) {
      ref.current = props?.el;
    }
  }, [ref, props?.el]);

  return {
    el,
    ref,
  };
};import useResizeObserver from "@react-hook/resize-observer";
import { useElement } from "./useElement";
export type ElementSizeProps<T> = {
ref?: MutableRefObject<T>;
el?: T;
};
/**
* A hook for measuring the size of HTML elements including when they change
* @returns the size of the HTML element
*/
export const useElementSize = <T extends HTMLElement>(
props: ElementSizeProps<T>
) => {
// Get the element
const { el, ref } = useElement(props)
// The size of the element
const [size, setSize] = useState<DOMRect>(
() => el?.getBoundingClientRect() || new DOMRect()
);
// Use ResizeObserver to resize the element when it changes (Performance)
useResizeObserver(el!, (entry) => setSize(entry.contentRect));
return { size, ref, el };
};const App: React.FC = () => {
// ...
const initializeApp = (app: Application) => {
setApp(app);
resize();
app.stage.eventMode = "static";
app.stage.hitArea = app.screen;
};
return (
// ...
<Stage
// ...
width={CANVAS_WIDTH}
height={CANVAS_HEIGHT}
onMount={initializeApp}
>
</Stage>
// ...
);
};
const App: React.FC = ({ photo }) => {
  // Custom hook to calculate new dimensions with a 9:16 aspect ratio
  const { width, height, centerX, centerY } = useStageDimensions({
    app,
    parentWidth: parentSize?.width,
    parentHeight: parentSize?.height,
  });

  return (
    <Stage>
      // Stretching to fit the given dimension
      {!!photo && (
        <Sprite
          image={photo}
          width={width}
          height={height}
          anchor={0}
          position={[centerX, centerY]}
        />
      )}
    </Stage>
  );
};
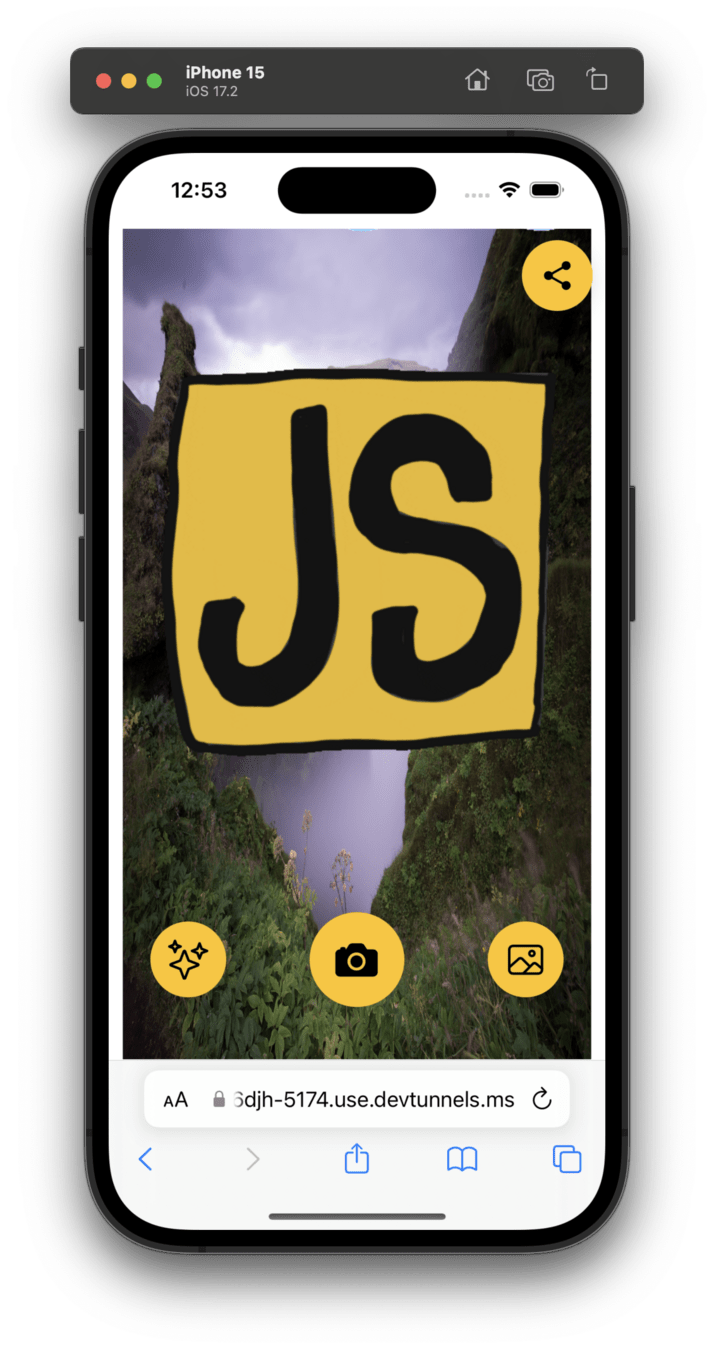
Only render the sprite when there's a photo! 🫡
const App: React.FC = ({ photo }) => {
  // Custom hook to calculate new dimensions with a 9:16 aspect ratio
  const { width, height, centerX, centerY, ratio } = useStageDimensions({
    app,
    parentWidth: parentSize?.width,
    parentHeight: parentSize?.height,
  });

  return (
    <Stage>
      // The image keeps the aspect ratio
      {!!photo && (
        <Sprite
          image={photo}
          scale={ratio}
          anchor={0.5}
          x={CANVAS_WIDTH / 2}
          y={CANVAS_HEIGHT / 2}
        />
      )}
    </Stage>
  );
};
const App: React.FC = ({ stickers }) => {
  // Custom hook to calculate new dimensions with a 9:16 aspect ratio
  const { width, height, centerX, centerY, ratio } = useStageDimensions({
    app,
    parentWidth: parentSize?.width,
    parentHeight: parentSize?.height,
  });

  return (
    <Stage>
      {stickers?.map((sticker, index) => (
        <DraggableContainer
          key={`${sticker}_${index}`}
          width={CANVAS_WIDTH}
          height={CANVAS_HEIGHT}
          scale={ratio}
          x={centerX}
          y={centerY}
        >
          <ImageSprite
            app={app}
            imageSrc={sticker}
            anchor={0.5}
            x={CANVAS_WIDTH / 2}
            y={CANVAS_HEIGHT / 2}
          />
        </DraggableContainer>
      ))}
    </Stage>
  );
};
export const shareOrDownloadImage = async (
  filename: string,
  imageBlob: Blob
) => {
  if (navigator.canShare) {
    const file = new File([imageBlob], filename, { type: imageBlob.type });
    const filesArray = [file];
    if (navigator.canShare({ files: filesArray })) {
      try {
        return await navigator.share({
          files: filesArray,
        });
      } catch (error) {
        console.error(`shareOrDownloadImage(${error})`);
        downloadImage(filename, imageBlob);
      }
    }
  }
  downloadImage(filename, imageBlob);
};
With the Web Share API, we can now create applications that allow users to share data as they would from a native application
const downloadImage = (filename: string, imageBlob: Blob) => {
  const anchorElement = document.createElement("a");
  const fileUrl = URL.createObjectURL(imageBlob);
  anchorElement.href = fileUrl;
  anchorElement.download = filename;
  anchorElement.click();
  anchorElement.remove();
  URL.revokeObjectURL(fileUrl);
};export const renderAndShareCanvasImage = async (
app: Application,
filename: string,
imageWidth: number,
imageHeight: number,
centerX: number,
centerY: number,
format = "image/png",
extension = "png"
) => {
const renderTexture = RenderTexture.create({
width: imageWidth,
height: imageHeight,
resolution: window.devicePixelRatio || 1,
});
const transformMatrix = new Matrix().translate(-centerX, -centerY);
app.renderer.render(app.stage, {
renderTexture,
transform: transformMatrix,
});
const base64 = await app.renderer.extract.base64(renderTexture, format, 1);
const blob = base64StringToBlob(
base64.replace(`data:${format};base64,`, ""),
format
);
await shareOrDownloadImage(`${filename}.${extension}`, blob);
};- Stories App Repo: https://github.com/proyecto26/stories-app
- PixiJS Open Games: https://github.com/pixijs/open-games
- Discord: https://discord.gg/DUZbqjt8hK
- Your first WebGPU app: https://codelabs.developers.google.com/your-first-webgpu-app#0
- WebGL samples: https://webgpu.github.io/webgpu-samples/samples/particles
- WebGPU For Dummies: https://people.distributive.network/amir/WebGPU-For-Dummies.html
- PixiJS Essentials Kit: https://github.com/ShukantPal/pixi-essentials
By J.D Nicholls
A brief presentation about mixing Canvas/WebGL/WebGPU with React using PixiJS for creating amazing web experiences! <3


