ESP32 Wi-Fi
Introduction
Welcome to the Wokwi ESP32 MicroPython Wi-Fi Connection Guide!
Workwi Simulator Environment Setup
- Navigate to Wokwi ESP32 MicroPython Project.
- Start a new project and choose ESP32 as your microcontroller.
- Wokwi simulates a Wi-Fi network that you can use to prototype IoT projects.
Understanding the Code
We'll write a simple MicroPython script to connect to a simulated Wi-Fi network named 'Wokwi-GUEST'.
Here's a breakdown of the code Connecting from MicroPython:
- Import libraries:
networkfor networking functionality, andtimefor pausing the script. - Print a message to the console to indicate the Wi-Fi connection process is starting.
- Create a WLAN (Wireless Local Area Network) object to interact with the Wi-Fi settings.
- Activate the WLAN interface.
- Attempt to connect to the 'Wokwi-GUEST' Wi-Fi network.
- Wait until the connection is established before proceeding.
- Print a message to the console to indicate the Wi-Fi connection is successful.
Writing MicroPython Code
Type the following MicroPython code directly into the Wokwi editor:
import network
import time

print("Connecting to WiFi", end="")
sta_if = network.WLAN(network.STA_IF)
sta_if.active(True)
sta_if.connect('Wokwi-GUEST', '')
while not sta_if.isconnected():
    print(".", end="")
    time.sleep(0.1)
print(" Connected!")
Workwi WiFi Connect
Accessing Web Page Data
Once connected to Wi-Fi, you can access web pages and retrieve data.
Here is a simple example using the `urequests` library to send an HTTP GET request to a webpage:
import requests

# URL of the CSV file
url = "https://data.moenv.gov.tw/api/v2/aqx_p_432?api_key=b7df779e-71a6-4148-8379-5afbd441d803&limit=1000&sort=ImportDate%20desc&format=CSV"

# Send an HTTP GET request to the URL
response = requests.get(url)

# Check if the request was successful (status code 200)
if response.status_code == 200:
    # Get the content of the response
    response_text = response.text

    # Print the content of the CSV data
    print(response_text)

else:
    print(f"Failed to download CSV data. Status code: {response.status_code}")
Accessing Web Page Data
Get AQI information
res = response_text.split("\n")

cols = res[2].split(',')
print(f"cols {cols}")
#print(cols.index('aqi'))
#get hualien data_type
for info in res:
    if '花蓮' in info:
        #print(info)
print(info.split(',')[cols.index('aqi')])WiFi AQI Information
Additional Resources
- Explore Wokwi documentation for more details on ESP32 Wi-Fi networking and simulations: Wokwi ESP32 WiFi Networking Guide.
- For advanced networking, like sending HTTP requests or establishing MQTT connections, learn about libraries like
urequestsandumqtt.
Conclusion
Now you've learned the basics of setting up a Wi-Fi connection on an ESP32 using MicroPython in Wokwi, and how to access web page data. Keep experimenting and happy coding!
RTC Module in MicroPython
- The
RTCmodule in MicroPython is used for real-time clock functionality.
- It allows setting and retrieving the current date and time.
- The
datetimemethod can be used both to set and get the date and time.
RTC.datetime Method
- The
datetimemethod returns an 8-tuple when called without arguments.
- The tuple format is:
(year, month, day, weekday, hours, minutes, seconds, subseconds).
-
subsecondsis hardware-dependent.
- To set the date and time, pass an 8-tuple to
datetime.
RTC Module Example code
from machine import RTC
# Create an RTC object
rtc = RTC()
# Set the date and time
rtc.datetime((2017, 8, 23, 1, 12, 48, 0, 0))
# Retrieve the current date and time
current_datetime = rtc.datetime()
print(f"current_datetime : {current_datetime}")
Time Module in MicroPython
- The
timemodule provides functions to work with time.
-
localtime([secs])converts time in seconds since the Epoch to an 8-tuple.
- If
secsis not provided, the current time is used.
-
gmtime()returns UTC time, whilelocaltime()returns local time.
Time.localtime and gmtime Functions
- The format of the 8-tuple is:
(year, month, mday, hour, minute, second, weekday, yearday). -
yearincludes the century (e.g., 2014). -
monthis 1-12 -
mdayis 1-31. -
houris 0-23;minuteandsecondare 0-59. -
weekdayis 0-6 for Monday to Sunday -
yeardayis 1-366.
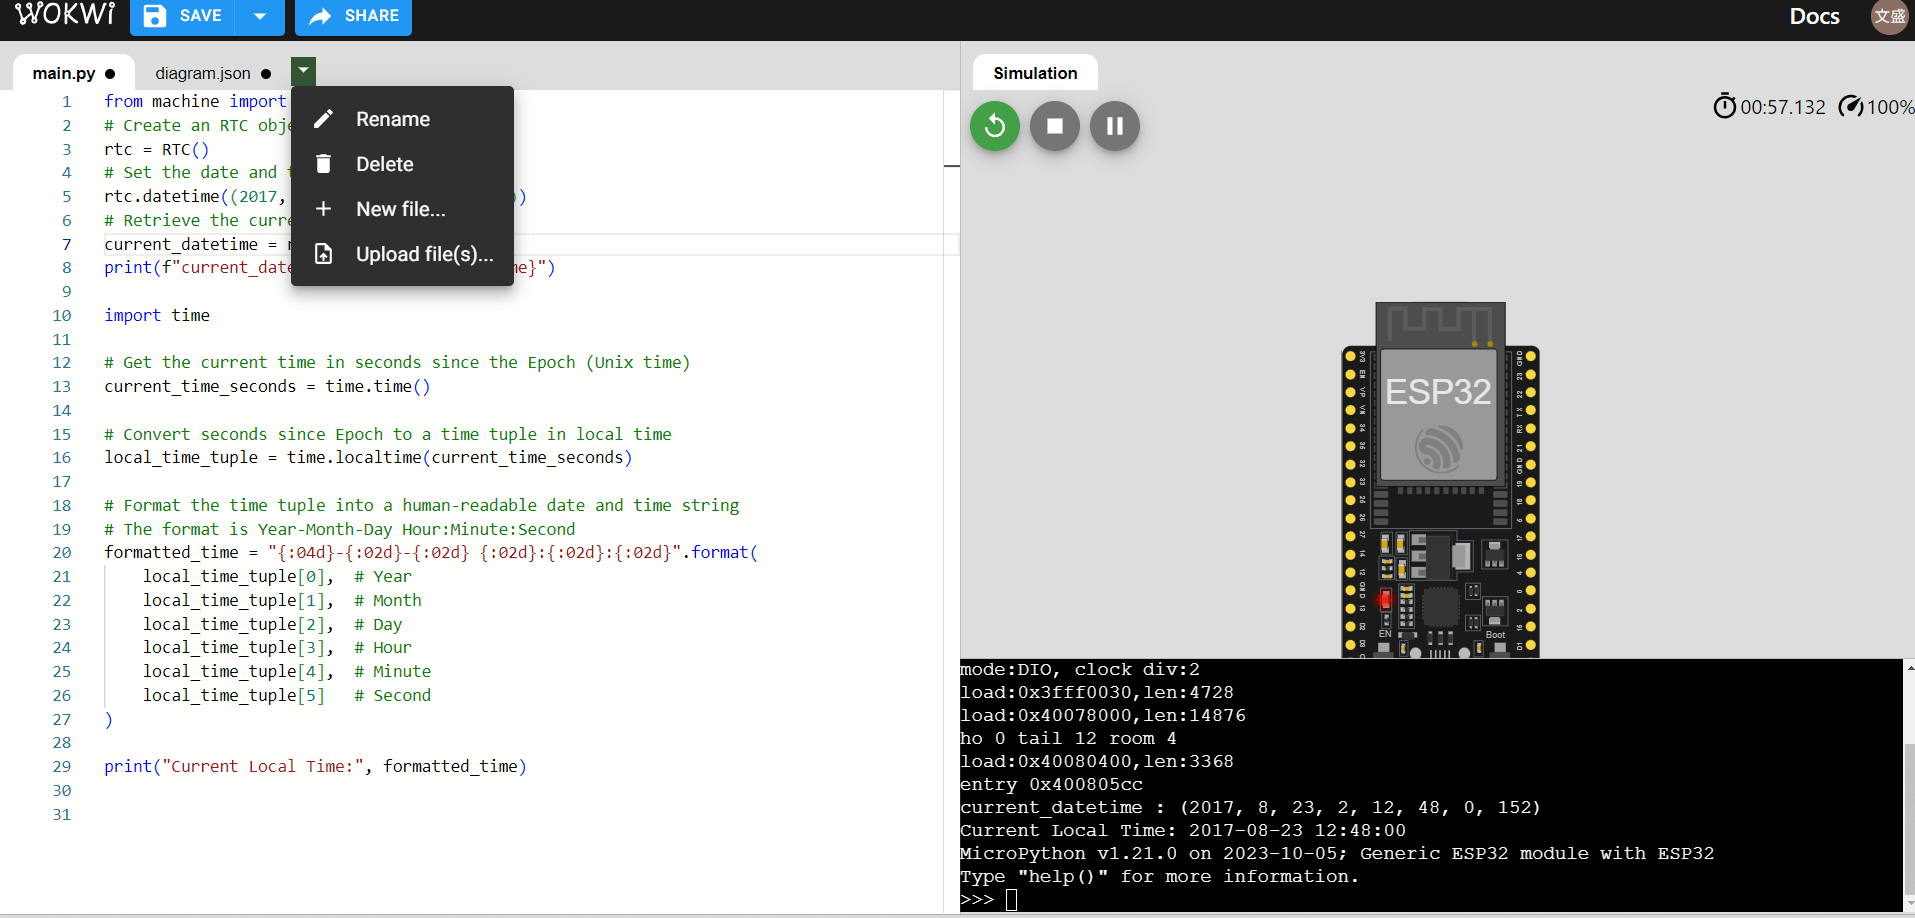
Time Example Code
import time

# Get the current time in seconds since the Epoch (Unix time)
current_time_seconds = time.time()

# Convert seconds since Epoch to a time tuple in local time
local_time_tuple = time.localtime(current_time_seconds)

# Format the time tuple into a human-readable date and time string
# The format is Year-Month-Day Hour:Minute:Second
formatted_time = "{:04d}-{:02d}-{:02d} {:02d}:{:02d}:{:02d}".format(
    local_time_tuple[0],  # Year
    local_time_tuple[1],  # Month
    local_time_tuple[2],  # Day
    local_time_tuple[3],  # Hour
    local_time_tuple[4],  # Minute
    local_time_tuple[5]   # Second
)

print("Current Local Time:", formatted_time)
ntptime Module in MicroPython
- The
ntptimemodule is used to synchronize the RTC with an NTP server.
- This provides precise time, especially useful when the RTC is not accurate.
- Use
ntptime.settime()to update the RTC.
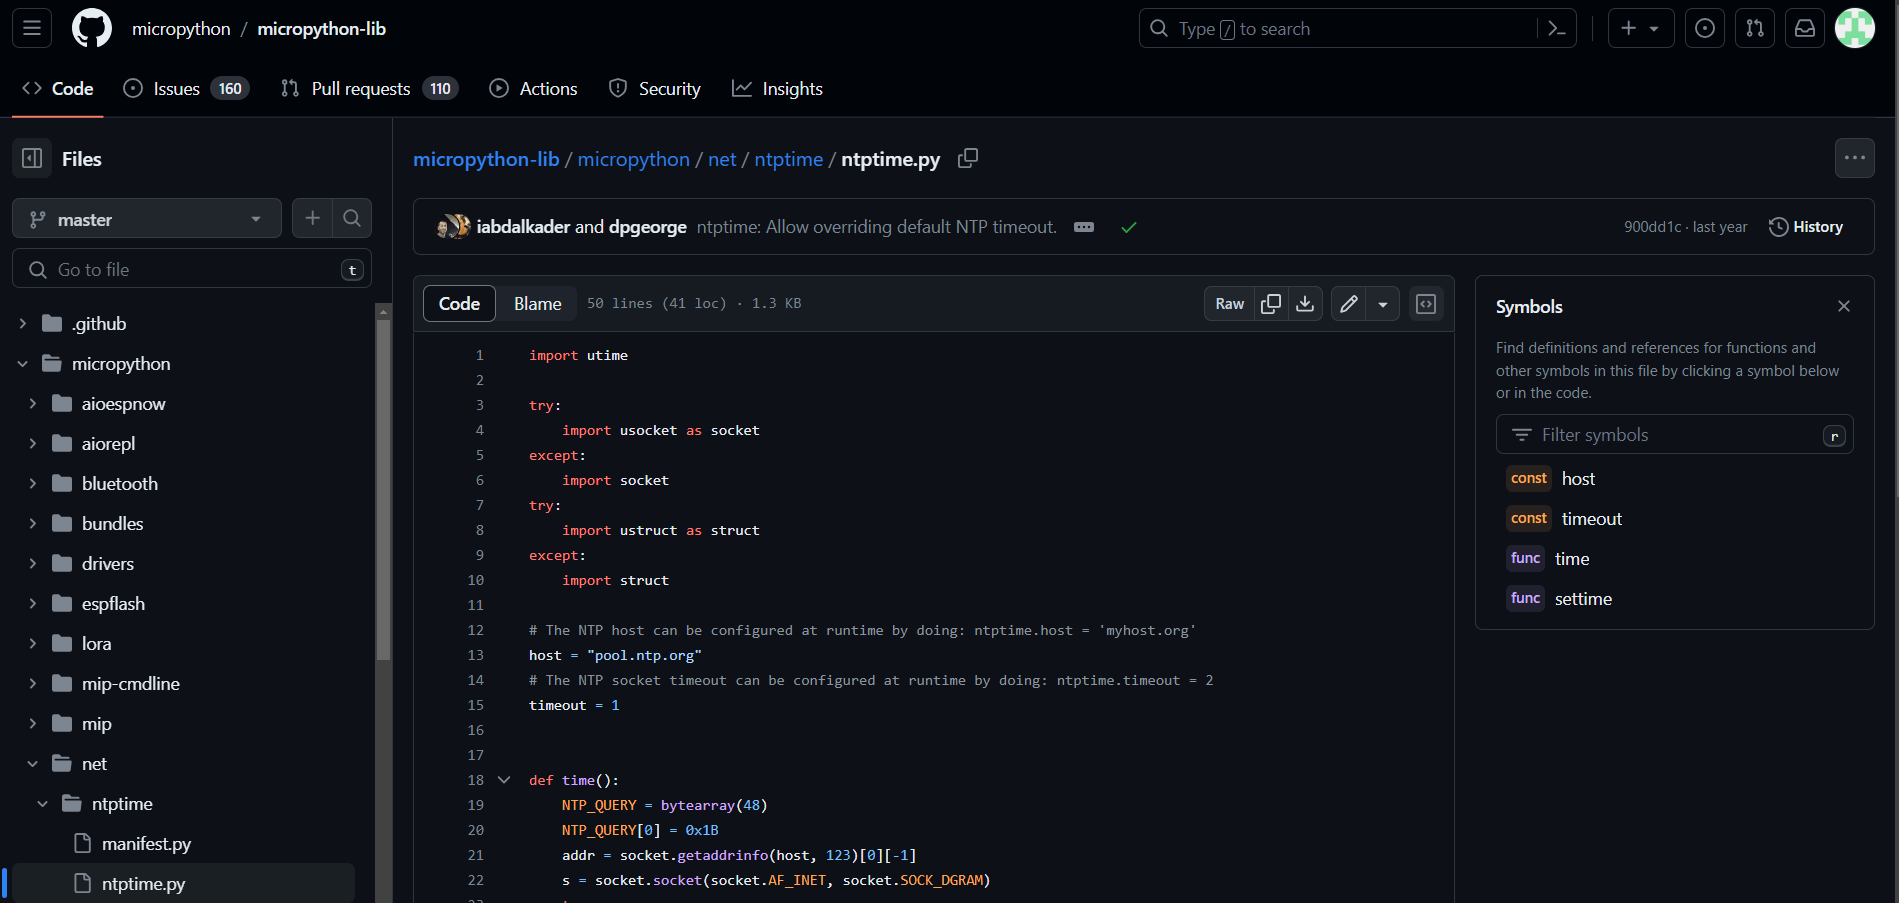
Download ntptime Module
Upload ntptime Module
ntptime Example Code
ESP32 Networking Basics 🔗
ESP32 as an Access Point (AP)
-
Function:
Creates a standalone Wi-Fi network that other devices can join. -
Use Cases:
Setting up a local network for IoT devices, workshops, or temporary setups. -
Advantage:
Useful where no existing Wi-Fi network is available, or for creating an isolated network.
Initialization
import network, time
ap = network.WLAN(network.AP_IF) # Initializes the access point interface
ap.active(False) # Deactivates the first AP interface
time.sleep(0.1) # Waits for 0.1 seconds to ensure the interface is properly deactivated
ap.active(True) # Reactivates the first AP interface
Configuring the Access Point
ap.config(ssid='MyESP32AP') # Sets the SSID and password of the AP
print('AP IP:', ap.ifconfig()[0]) # Displays the IP address of the ESP32 in AP mode
ESP32 as a Wi-Fi Station (STA)
-
Function:
Connects ESP32 to an existing Wi-Fi network. - Use Cases:
Access the internet
interact with web services
communicate with other network devices.
- Advantage:
Enables ESP32 to become part of a larger network, such as home automation.
Initialization
import network, time
wlan = network.WLAN(network.STA_IF) # Initializes the station interface
wlan.active(True) # Activates the WLAN interface
ssid = 'CSIE_C306'
passwd = '@ndhuc306'
Connecting to a Wi-Fi Network
connected = wlan.isconnected() # Check if the connection was successful
if not connected: # if it is not connected
    print(f'Trying to connect to {ssid}') # Display a message indicating an attempt to connect
    wlan.connect(ssid, passwd) # Attempt to connect to the Wi-Fi network again
    for _ in range(100): # Try to connect 100 times, waiting 0.1 seconds each time
        connected = wlan.isconnected() # Check if the connection was successful
        if connected:
           break # Break out of the loop if connected
        time.sleep(0.1) # Wait for 0.1 seconds before checking again
        print('.', end='') # Print progress dots to indicate ongoing connection attempts

if connected: # If connected successfully
    # Display successful connection and network configuration
    print(f'\nConnected to ssid {ssid}. Network config: {wlan.ifconfig()}')
else: # If the connection failed
    print(f'\nFailed. Not Connected to: {ssid}') # Display a failure message
Access AQI Information
import urequests
# URL of the CSV file
url = "https://data.moenv.gov.tw/api/v2/aqx_p_432?\
api_key=e8dd42e6-9b8b-43f8-991e-b3dee723a52d&limit=1000&sort=ImportDate%20desc&format=CSV"

# Send an HTTP GET request to the URL
response = urequests.get(url)

# Check if the request was successful (status code 200)
if response.status_code == 200:
    # Get the content of the response
    response_text = response.text
    # Print the content of the CSV data
    print(response_text)
else:
    print(f"Failed to download CSV data. Status code: {response.status_code}")

res = response_text.split("\n")
cols = res[2].split(',')
print(f"cols {cols}")
#print(cols.index('aqi'))
#get hualien data_type
for info in res:
    if '花蓮' in info:
        #print(info)
        aqi = info.split(',')[cols.index('aqi')]
        print(f"花蓮  AQI : {aqi}")
Excercise
Show the AQI information to OLED
花蓮
AQI : 19
ESP32 Wi-Fi
By wschen
ESP32 Wi-Fi
Discover the power of ESP32 Wi-Fi with this engaging presentation! Learn how to set up a simulator environment, write MicroPython code, connect to Wi-Fi, and access web page data. Plus, find additional resources to enhance your learning. Don't miss out!


