INTRODUCTION TO HTML
NAMING FILES & IMAGES
- HTML files must end with .html
- All web graphics must have a suffix (.jpg, .png)
- A websites landing page should always be named index or default
- Don't use spaces when naming
- Don't use special characters in the files name
- File names are case sensitive
- Keep file names short and use descriptive words
HTML SYNTAX
HTML SYNTAX
-
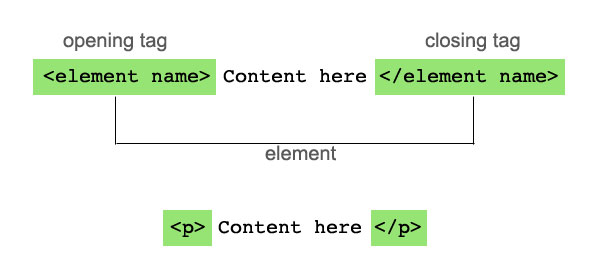
element - consists both of the content and its markup
-
tags - used to "mark up" content.
-
consists of the element name within angle brackets
-
most tags have an opening and a closing tag
-
example: <p>content goes here </p>
-
are NOT displayed in the browser
-
- markup - another name for tags added around content
Although capitalization does not matter, use lower case when writing tags.
DOCUMENT STRUCTURE
<!doctype html>

<html lang="en">
<head>
  <meta charset="utf-8">

  <title>The HTML5 Herald</title>
  <meta name="description" content="The HTML5 Herald">
  <meta name="author" content="SitePoint">

  <link rel="stylesheet" href="style.css">

</head>

<body>

</body>
</html>
DOCUMENT STRUCTURE
<!doctype html>DOCTYPE Declaration
-
Identifies what kind of HTML or XHTML document it is
-
This document type is HTML 5
-
You need to declare a doctype in order to validate your code
DOCUMENT STRUCTURE
        <!doctype html>

 <html>


 </html>
HTML ELEMENT
-
The entire document is enclosed in an HTML opening and closing tag
DOCUMENT STRUCTURE
HEAD ELEMENT
-
Contains descriptive information about the document including page title, and links to external css and scripting files
        <!doctype html>

<html>


<head>
<meta charset ="utf-8">
<title>Page Title goes here</title>
</head>


     <body>

    </body>
    </html>
DOCUMENT STRUCTURE
BODY ELEMENT
-
Contains everything that will show up in the browser window
        <html lang="en">

<head>
<meta charset ="utf-8">
<title>Page Title goes here</title>
</head>

<body>
  Content goes here!!
</body>


        </html>
DEMO: CREATING A DOCUMENT
SEMANTIC MARKUP
-
Using tags to describes the purpose of the content
-
If you want to add paragraphs, then the content should be between <p> tags.
-
The most important heading should be between <h1> tags
-
Helps give the document structure and create relationships with content
BLOCK AND INLINE ELEMENTS
-
Block: Elements that create a line break
-
Example: <p> Create a paragraph break
-
-
Inline: Elements that do not create a line break
- Example: <strong> creates bold text without interrupting the flow of the paragraph
DEFAULT STYLES
-
If an element does not have a style applied to it, it will load the browser default style
-
All browsers have their own different set of default styles
-
It's good practice to clear all the default styles in a style sheet.
EMPTY ELEMENTS
Elements that do not have a corresponding closing tag
An image tag is an empty element
<img src="path goes here">
<img src="images/logo.jpg">
<br>
<hr>
ATTRIBUTES
<img src="images/logo.jpg" alt="Company logo" width="300" height="300">-
add data that the tag may need in order to render it correctly
-
attributes are placed AFTER an element name in the opening tag
-
most attributes are assigned values
-
some attributes are required, others are optional
In the above example, src, alt, width and height are all attributes
BLOCK LEVEL TAGS
<p> Lorem ipsum dolor sit amet, consectetur adipisicing elit,
sed do eiusmod tempor incididunt ut labore et dolore magna
aliqua. Ut enim ad minim veniam, quis </p>-
paragraph tag- creates paragraph breaks
-
<p> content goes here </p>
BLOCK LEVEL TAGS
<h1> Largest most important heading</h1>
<h2> The second largest most important heading</h2>-
header tags - indicate headings
-
start with <h1> (the largest heading) and end with <h6> (the smallest heading)
-
<h1>Heading goes here</h1>
-
BLOCK LEVEL TAGS
Content gores here!<br>
More content goes here!-
Line break- creates a single line break
-
<br>- it's a self closing element
-
-
Horizontal rule- creates horizontal line
-
<hr>- it's a self closing element
-
BLOCK LEVEL TAGS
<ol>
   <li>List item 1</li>
   <li>List item 2</li>
</ol>-
Ordered List: list with numbers
-
<ol><li>Item</li></ol>
-
BLOCK LEVEL TAGS
<ul>
   <li>List item 1</li>
   <li>List item 2</li>
</ul>-
Unordered List: list with bullets
-
<ul><li>Item</li></ul>
-
BLOCK LEVEL TAGS
<dl>
   <dt>Item</dt>
   <dd>description of item 1</dd>
   <dt>Item2</dt>
   <dd>description of item 2</dd>
</dl>-
Description List: List that contains name and value pairs
-
<dl><dt>Item</dt><dd>Item description</dd></dl>
-
BLOCK LEVEL TAGS
-
Block quote: used to enclose a quote
-
<blockquote> content goes here</blockquote>
-
-
Preformatted text: adds white space in text
-
<pre> has white space when I press
return</pre>
-
-
Figures: use for content that illustrates or supports text
-
<figure> <img src="images/chart.jpg"></figure>
-
BLOCK LEVEL TAGS
-
Section: divides long copy into sections
-
<section> content goes here</section>
-
-
Article: divides copy into articles. Good for blogs
-
<article> article copy goes here</article>
-
-
Aside: use for sidebar
-
<aside> Sidebar content goes here</aside>
-
BLOCK LEVEL TAGS
-
Navigation: identifies navigation for a site
-
<nav> home | about | contact</nav>
-
-
Header: identifies the "top" of a web page
Should include logo, navigation, site title-
<header>header material goes here</header>
-
-
Footer: identifies the "bottom" of a webpage
-
<footer> Sidebar content goes here</footer>
-
INLINE TAGS
- <em> </em> - italics
-
<strong></strong> - bold
-
<s></s> - strike through
-
<u></u> - underline
-
<small></small> - small text
-
<q></q> - quotations
-
<abbr></abbr>- abbreviation
INLINE TAGS
-
<abbr></abbr>- abbreviation
-
<cite></cite> - citations
-
<sup></sup> - superscript
-
<sub></sub> - subscript
-
<mark></mark> - highlights text
DIV TAGS
-
generic block level tags
-
you can assign an id or class to a divthe class or id name is something that you create
-
you can then style that id or class by targeting it in
-
your CSS document
<div class="leftCol">
  Content goes here
</div>

<div id="rightCol">
   Content Goes here
</div>
ID & CLASSES
-
is an optional attribute of an html tag
-
assigns a unique identifier to an html tag
-
the id or class name is something that you create
-
you can then target the specific id or class name in your css to add styles to that html element
SPAN TAGS
-
inline generic tags
-
used like a div except it doesn't add a line break
-
good for adding color to a specific word in a paragraph
-
assign a span a class or ID and then target it in your CSS
Content goes here.<span class="red">Content goes here.</span>
Content goes here.
ID ATTRIBUTES
-
Can use only once in an html document
<div id="redParagraph">
Lorem ipsum dolor sit amet, consectetur adipisicing elit, sed do eiusmod tempor incididunt ut labore et dolore magna aliqua. Ut enim ad minim veniam, quis
</div>
CLASS ATTRIBUTES
-
Can use more than once in an html document
<div class="myNewClass">
     content goes here
</div>
SPECIAL CHARACTERS
-
You need to watch out for adding special characters in your HTML text. They may read as HTML.
-
https://www.teachucomp.com/special-characters-in-html-tutorial/
ADDING LINKS
ANCHOR TAG
-
used for linking pages
-
href is an attribute used to provide the URL you want to link to
-
<a href="url">link me!</a>
<a href="http:google.com"> my link to google! </a>OPENING THE LINK IN A NEW WINDOW
-
use the attribute "target="_blank"
-
it's good practice have any links where the user leaves your site to open in a new window
-
pop up windows are not a good idea because they are not mobile friendly
<a href="http://www.google.com" target="_blank">
   my link to google!
</a>
LINKING TO EMAIL ADDRESSES
-
still use the <a href> tag
-
add mailto: in the link
-
it will automatically open the users default email program and prefill the to: box with your email address
-
<a href="mailto:email@email.com">Contact</a>
<a href="mailto:jen@jenwitkowski.com">
   contact me!
</a>
TELEPHONE LINKS
-
good for smartphones!
-
People can click the phone number at it will automatically dial
-
nothing happens when users click on it on a desktop browser
-
must include the full number with area code
<a href="tel:+17165555555">
   1-716-555-5555
</a>
JUMP LINKS
-
jump to a specific point on the page when clicked
-
use the id attribute to identify where to jump to
-
<a href="#myLink">Jump to my Link</a>- the link that will jump the page
-
<h1 id="myLink">Jump to me!</h1> - what the link will jump to
<a href="#myLink">
   Jump to my Link!
</a>
Lorem ipsum dolor sit amet, consectetur adipisicing elit, sed do eiusmod tempor incididu
<h1 id="myLink">Jump to me!</a>
Lorem ipsum dolor sit amet, consectetur adipisicing elit, sed do eiusmod tempor incididunt ut labore et dolore magna aliqua. Ut enim ad minim veniam, quis nostrud exercitation ullamco laboris nisi ut aliquip ex ea commodo consequat. Duis aute irure dolor in reprehenderit in voluptate velit esse
FILE DIRECTORIES
-
A directory is another name for a folder
-
Organization of files is very important
-
If you move directories (IE- delete a folder or move files inside/outside of a folder), you have to relink all of your links that point to the directory that you changed.
-
The main folder is called the "root"
LINKING TO A PAGE IN YOUR DIRECTORY
-
don't have to use http://
-
link to folders and files within your directory
-
A "/" moves down a directory.
-
A "../" moves up a directory
<a href="socks/white/whitestripes.html">link me!</a><a href="../socks/white/whitestripes.html">link me!</a>RELATIVE & ABOLSUTE PATHS
-
http://www.mysite.com
-
http://www.mysite.com/graphics/image.png
-
http://www.mysite.com/help/articles/how-do-i-set-up-a-webpage.html
Relative: Assumes the file you're linking from is in the "root" directory
Absolute: Assumes that you're linking outside of the root directory
-
index.html
-
/graphics/image.png
-
/help/articles/how-do-i-set-up-a-webpage.html
LINKING & FILE MANAGMENT
Demo
ADDING IMAGES
LINKING TO IMAGES
-
self closing element
-
links to the source
-
<img src="images/myImages.jpg"/>
-
alt attribute should be added. It adds a description to the image if the image does not load.
-
<img src="images/myImages.jpg" alt="a photo of my car"/>
IMAGE CACHING
-
The browser "caches" or stores images for a period of time to allow for quicker loading.
-
If you're updating a site and switch out any images, make sure to refresh a few times and clear the cache to see your results
IMAGE WIDTH & HEIGHT ATTRIBUTES
-
You can add the width and height attribute to an image
-
Make sure that the width and height is the "actual" width and height of the saved images, or it will distort it
<img src="images/myImage.jpg" width="300" height="300"/>ADDING SVGs
-
export vector as an svg
-
can be embedded just like a regular image
<img src="images/circle.svg" alt="circle">ADVANTAGES OF SVGS
-
require less data and therefore are fast to load and download
-
resize as needed in a responsive layout
-
can be animated
-
can easily change how they look by using CSS
-
can add interactivity with JavaScript
RESPONSIVE IMAGES
-
Help images look crisp on high-density screens
-
Provide different images cropped at different sizes to appear on different screen sizes
-
Provide various versions of the images with varying details based on device size & orientation
-
Provide alternative image formats
Responsive attributes can:
RESPONSIVE IMAGES
-
SRCSET
-
X-Selector OR
-
Y-Descriptor
-
- Picture Element
You can create responsive images using:
SRCSET
-
Image attribute that serves up larger images for high density screens
-
Provides a comma separated list of what images to serve up for what screens
<img
    src="images/trees-200px.jpg" alt="trees"
    srcset="images/trees-400px.jpg 2x,
            images/trees-600px.jpg 3x" >
Using the X-Selector
- The X selector makes the selection based on resolution, NOT on screen size or viewport size
SRCSET
<img
    src="images/trees-600px.jpg" alt="trees"
    srcset="images/trees-320px.jpg 320w,
            images/trees-640px.jpg 640w,
            images/trees-1000px.jpg 1000w"
    sizes="100vw">
Using the w-descriptor
- Sizes attribute tells how wide you want the image to appear
- Makes image selections based on viewport size
PICTURE ELEMENT
- Used to change the focus of a cropped image

PICTURE ELEMENT
<picture>
  <source media="(min-width: 1024px)" srcset="dogs-large.jpg">
  <source media="(min-width: 760px)" srcset="dogs-medium.jpg">
  <img src="dogs-small.jpg" alt="white house dog">
</picture>
INTRODUCTION TO HTML
By shadow4611