ESP32 OLED SSD1306
Wokwi SSD1306
- Monochrome 128x64 OLED display with I2C interface. Default I2C address: 0x3c (60).
- Pin Names:
- DATA: I2C data line (SDA)
- CLK: I2C clock line (SCL)
- 3V3: 3.3V regulated output
- GND: Ground
- VIN: Supply voltage 5V
- Attributes:
- i2cAddress: I2C address of the display, default value "0x3c".
- Note: The SSD1306 simulation only supports I2C mode, so pins DC, RST, and CS for SPI mode are not functional[1].

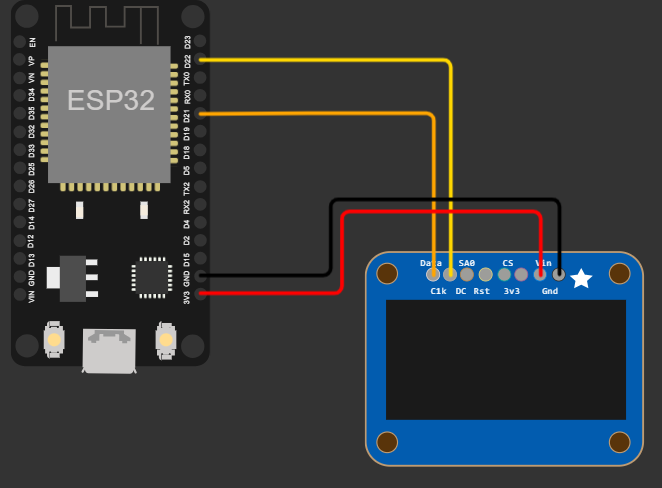
Connecting ESP32 to OLED ssd1306
- Wiring:
- ESP32 Pin 22 to OLED SCL
- ESP32 Pin 21 to OLED SDA
- ESP32 GND to OLED GND
- ESP32 3.3V to OLED VCC
SSD1306 Driver 🔗
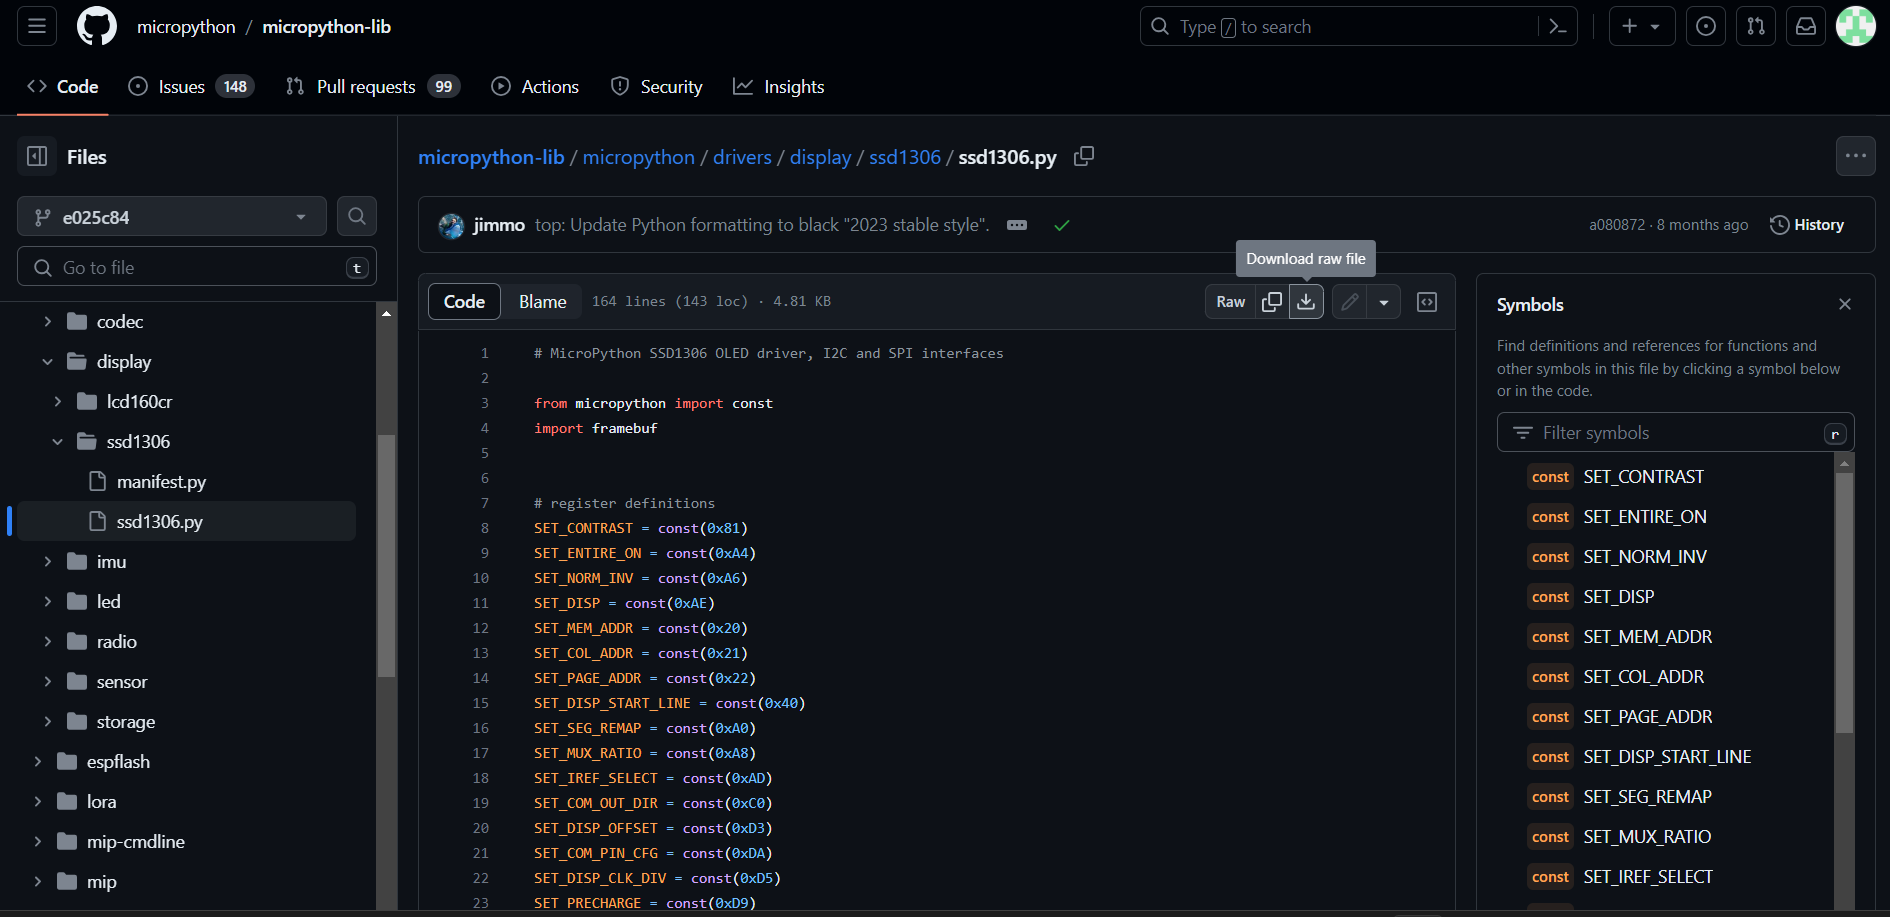
upload SSD1306 Driver
upload SSD1306 Driver
Simple "Hello World" Code
from machine import Pin, I2C
import ssd1306

# ESP32 Pin assignment
i2c = I2C(0, scl=Pin(22), sda=Pin(21))

oled_width = 128
oled_height = 64
oled = ssd1306.SSD1306_I2C(oled_width, oled_height, i2c)

# Display "Hello World!!"
oled.text('Hello World!!', 0, 0)
oled.show()
A Simple "Hello World" Example
Additional OLED Functions
# Basic Functions
oled.fill(0)           # Clear the display
oled.show()            # Update the display
display.poweroff()     # power off the display
display.poweron()      # power on the display
display.contrast(255)  # set brightness
display.invert(1)      # invert display colors

# Drawing Functions
display.pixel(10, 10, 1)     # set pixel at x=10, y=10
display.hline(0, 20, 50, 1)  # draw horizontal line
display.vline(0, 30, 50, 1)  # draw vertical line
display.rect(10, 10, 60, 30, 1)  # draw rectangle outline
display.fill_rect(10, 10, 60, 30, 1)  # draw filled rectangle
More Code
from machine import Pin, I2C
import ssd1306

# ESP32 Pin assignment
i2c = I2C(0, scl=Pin(22), sda=Pin(21))

oled_width = 128
oled_height = 64
oled = ssd1306.SSD1306_I2C(oled_width, oled_height, i2c)

oled.fill(0)  # Clear the display
oled.rect(10, 30, 108, 10, 1)  # Draw slider outline
oled.fill_rect(10, 30, 20, 10, 1)  # Fill slider with position
oled.show()  # Update the display
More Code
from machine import Pin, I2C
import ssd1306

# ESP32 Pin assignment
i2c = I2C(0, scl=Pin(22), sda=Pin(21))

oled_width = 128
oled_height = 64
display = ssd1306.SSD1306_I2C(oled_width, oled_height, i2c)

display.fill(0)                         # fill entire screen with colour=0
display.pixel(0, 10)                    # get pixel at x=0, y=10
display.pixel(0, 10, 1)                 # set pixel at x=0, y=10 to colour=1
display.hline(0, 8, 4, 1)               # draw horizontal line x=0, y=8, width=4, colour=1
display.vline(0, 8, 4, 1)               # draw vertical line x=0, y=8, height=4, colour=1
display.line(0, 0, 127, 63, 1)          # draw a line from 0,0 to 127,63
display.rect(10, 10, 107, 43, 1)        # draw a rectangle outline 10,10 to 117,53, colour=1
display.fill_rect(10, 10, 107, 43, 1)   # draw a solid rectangle 10,10 to 117,53, colour=1
display.text('Hello World', 0, 0, 1)    # draw some text at x=0, y=0, colour=1
#display.scroll(20, 0)                   # scroll 20 pixels to the right

display.show()
More Code
from machine import Pin, I2C
import ssd1306

# ESP32 Pin assignment
i2c = I2C(0, scl=Pin(22), sda=Pin(21))

oled_width = 128
oled_height = 64
display = ssd1306.SSD1306_I2C(oled_width, oled_height, i2c)

display.fill(0)                         # fill entire screen with colour=0
# draw another FrameBuffer on top of the current one at the given coordinates
import framebuf
fbuf = framebuf.FrameBuffer(bytearray(8 * 8 * 1), 8, 8, framebuf.MONO_VLSB)
fbuf.line(0, 0, 7, 7, 1)
display.blit(fbuf, 10, 10, 0)           # draw on top at x=10, y=10, key=0
display.show()
More Code
from machine import Pin, I2C
import ssd1306

# ESP32 Pin assignment
i2c = I2C(0, scl=Pin(22), sda=Pin(21))

oled_width = 128
oled_height = 64
display = ssd1306.SSD1306_I2C(oled_width, oled_height, i2c)

display.fill(0)
display.fill_rect(0, 0, 32, 32, 1)
display.fill_rect(2, 2, 28, 28, 0)
display.vline(9, 8, 22, 1)
display.vline(16, 2, 22, 1)
display.vline(23, 8, 22, 1)
display.fill_rect(26, 24, 2, 4, 1)
display.text('MicroPython', 40, 0, 1)
display.text('SSD1306', 40, 12, 1)
display.text('OLED 128x64', 40, 24, 1)
display.show()
Bitmap Font
| 1 | 1 | ||||||
| 1 | 1 | 1 | 1 | ||||
| 1 | 1 | ||||||
| 1 | 1 | 1 | 1 | 1 | 1 | ||
| 1 | 1 | 1 | 1 | 1 | 1 | ||
| 1 | 1 | ||||||
| 1 | 1 | 1 | 1 | ||||
| 1 | 1 | 1 | 1 |
Dot Matrix Tool
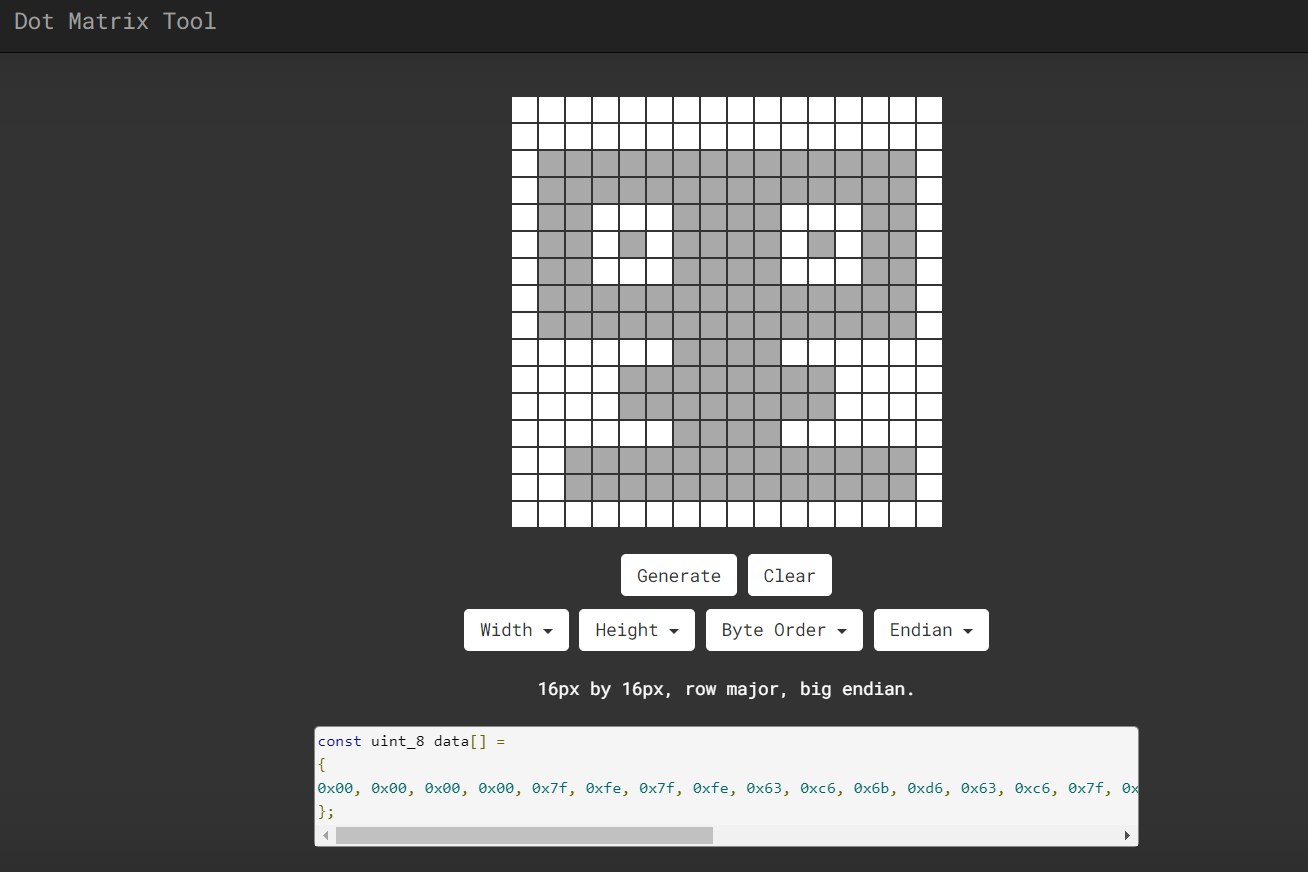
Example of Bitmap Font
Oled Chinese Font

0 0 0 0 0 0 0 0 0 0 0 0 0 0 0 0
0 0 0 1 0 0 0 1 1 1 1 1 1 1 0 0
0 0 0 1 0 0 0 0 0 0 0 0 1 1 0 0
0 0 1 0 0 0 0 0 0 0 0 0 1 0 0 0
0 1 1 1 1 1 1 0 0 0 0 1 0 0 0 0
0 0 1 1 0 0 1 0 0 0 1 0 0 0 0 0
0 0 1 1 0 0 1 0 0 0 1 0 0 0 0 0
0 0 1 0 0 1 0 1 1 1 1 1 1 1 1 0
0 1 1 0 0 1 0 0 0 0 1 0 0 0 0 0
0 1 1 1 0 1 0 0 0 0 1 0 0 0 0 0
0 1 0 1 1 1 0 0 0 0 1 0 0 0 0 0
0 0 0 0 1 1 0 0 0 0 1 0 0 0 0 0
0 0 0 1 0 1 1 0 0 0 1 0 0 0 0 0
0 0 1 1 0 0 1 0 0 0 1 0 0 0 0 0
0 1 0 0 0 0 0 1 1 1 1 0 0 0 0 0
0 0 0 0 0 0 0 0 0 0 0 0 0 0 0 0
Oled Chinese Font
      1       1 1 1 1 1 1 1
      1                 1 1
    1                   1
  1 1 1 1 1 1         1
    1 1     1       1
    1 1     1       1
    1     1   1 1 1 1 1 1 1 1
  1 1     1         1
  1 1 1   1         1
  1   1 1 1         1
        1 1         1
      1   1 1       1
    1 1     1       1
  1           1 1 1 1
0 0 0 0 0 0 0 0 0 0 0 0 0 0 0 0
0 0 0 1 0 0 0 1 1 1 1 1 1 1 0 0
0 0 0 1 0 0 0 0 0 0 0 0 1 1 0 0
0 0 1 0 0 0 0 0 0 0 0 0 1 0 0 0
0 1 1 1 1 1 1 0 0 0 0 1 0 0 0 0
0 0 1 1 0 0 1 0 0 0 1 0 0 0 0 0
0 0 1 1 0 0 1 0 0 0 1 0 0 0 0 0
0 0 1 0 0 1 0 1 1 1 1 1 1 1 1 0
0 1 1 0 0 1 0 0 0 0 1 0 0 0 0 0
0 1 1 1 0 1 0 0 0 0 1 0 0 0 0 0
0 1 0 1 1 1 0 0 0 0 1 0 0 0 0 0
0 0 0 0 1 1 0 0 0 0 1 0 0 0 0 0
0 0 0 1 0 1 1 0 0 0 1 0 0 0 0 0
0 0 1 1 0 0 1 0 0 0 1 0 0 0 0 0
0 1 0 0 0 0 0 1 1 1 1 0 0 0 0 0
0 0 0 0 0 0 0 0 0 0 0 0 0 0 0 0
Create Chinese Font File 📃
CHARACTER_DATA = {
    "空": [0, 0, 1, 0, 1, 0, 127, 254, 66, 66, 66, 66, 6, 64, 12, 66, 56, 126, 32, 0, 63, 252, 1, 0, 1, 0, 1, 0, 1, 0, 127, 252],
    "氣": [0, 0, 8, 0, 31, 254, 16, 0, 47, 248, 64, 0, 63, 240, 2, 144, 50, 208, 26, 144, 63, 240, 7, 16, 10, 138, 50, 106, 66, 6, 0, 0],
    "品": [0, 0, 0, 0, 15, 240, 8, 16, 8, 16, 8, 16, 8, 16, 15, 240, 0, 0, 126, 126, 66, 66, 66, 66, 66, 66, 66, 66, 126, 126, 66, 66],
    "質": [0, 0, 2, 4, 60, 122, 32, 64, 63, 126, 36, 136, 101, 136, 95, 248, 16, 8, 31, 248, 16, 8, 31, 248, 16, 8, 31, 248, 12, 56, 112, 7],
    "不": [0, 0, 0, 0, 0, 0, 127, 252, 1, 128, 1, 0, 3, 0, 7, 96, 13, 24, 25, 12, 113, 6, 193, 2, 1, 0, 1, 0, 1, 0, 1, 0],
    "好": [0, 0, 17, 252, 16, 12, 32, 8, 126, 16, 50, 32, 50, 32, 37, 254, 100, 32, 116, 32, 92, 32, 12, 32, 22, 32, 50, 32, 65, 224, 0, 0],
    "佳": [0, 0, 8, 64, 8, 64, 19, 252, 16, 64, 48, 64, 119, 252, 80, 0, 16, 64, 16, 64, 23, 252, 16, 64, 16, 64, 16, 64, 31, 254, 0, 0],
    "良": [0, 0, 1, 0, 1, 0, 31, 248, 16, 8, 16, 8, 31, 248, 16, 8, 16, 8, 31, 248, 17, 4, 17, 152, 16, 224, 16, 96, 31, 56, 120, 14],
    "差": [0, 0, 24, 16, 12, 48, 127, 254, 1, 0, 63, 248, 1, 0, 1, 0, 127, 252, 8, 0, 31, 252, 16, 192, 48, 192, 32, 64, 207, 254, 0, 0],
}
characters.py
Load Font and Required Libraries
# 下載台北思源黑體並命名taipei_sans_tc_beta.ttf
!wget -O TaipeiSansTCBeta-Regular.ttf https://drive.google.com/uc?id=1eGAsTN1HBpJAkeVM57_C7ccp7hbgSz3_&export=download
font_path = "/content/TaipeiSansTCBeta-Regular.ttf"

from PIL import Image, ImageDraw, ImageFont
from google.colab import files
Draw Character Grid
def draw_character_grid(char, font_path, image_size, grid_size):
    font = ImageFont.truetype(font_path, grid_size * 16)
    image = Image.new('L', image_size, 255)
    draw = ImageDraw.Draw(image)
    bbox = draw.textbbox((0, 0), char, font=font)
    char_width, char_height = bbox[2], bbox[3]
    x = (image_size[0] - char_width) // 2
    y = (image_size[1] - char_height) // 2 - 8
    draw.text((x, y), char, font=font, fill=0)
    for row in range(0, image_size[0], grid_size):
        draw.line([(row, 0), (row, image_size[1])], fill=128)
    for column in range(0, image_size[1], grid_size):
        draw.line([(0, column), (image_size[0], column)], fill=128)
    return image

# Usage:
char = '好'
image_size = (256, 256)
grid_size = 16
image = draw_character_grid(char, font_path, image_size, grid_size)
display(image)
Display Pattern
def display_pattern(bitmap):
    # Assuming 16x16 bitmap, 2 bytes per row
    for i in range(0, len(bitmap), 2):
        row = ''
        for j in range(2):  # Two bytes per row
            byte = bitmap[i+j]
            for k in range(8):  # Eight bits per byte
                bit = (byte >> (7 - k)) & 1
                row += str(bit)+" " if bit else '  '
        print(row)

char = [0, 0, 17, 252, 16, 12, 32, 8, 126, 16, 50, 32, 50, 32, 37, 254,
    100, 32, 116, 32, 92, 32, 12, 32, 22, 32, 50, 32, 65, 224, 0, 0]
display_pattern(char)
      1       1 1 1 1 1 1 1
      1                 1 1
    1                   1
  1 1 1 1 1 1         1
    1 1     1       1
    1 1     1       1
    1     1   1 1 1 1 1 1 1 1
  1 1     1         1
  1 1 1   1         1
  1   1 1 1         1
        1 1         1
      1   1 1       1
    1 1     1       1
  1           1 1 1 1
Generate Font Data
def generate_font_data(characters, font_path, size):
    font = ImageFont.truetype(font_path, size)
    font_data = {}
    for char in characters:
        image = Image.new('1', (16, 16), 0)
        draw = ImageDraw.Draw(image)
        draw.text((0, 0), char, font=font, fill=1)
        bitmap = list(image.getdata())
        byte_data = []
        for byte_pos in range(0, len(bitmap), 8):
            byte_value = 0
            for bit_no in range(8):
                bit = bitmap[byte_pos + bit_no]
                if bit:
                    byte_value |= 1 << (7 - bit_no)
            byte_data.append(byte_value)
        font_data[char] = byte_data
    return font_data

# Example usage:
characters = '空氣品質不好佳良差'
font_data = generate_font_data(characters, font_path, 16)
Write to Font File
characters = '空氣品質不好佳良差'
font_data = generate_font_data(characters, font_path, 16)

filename = "characters.py"
with open(filename, "w") as file:
    file.write("CHARACTER_DATA = {\n")
    for char, bitmap in font_data.items():
        file.write(f'    "{char}": {bitmap},\n')
    file.write("}\n")

with open(filename, "r", encoding='utf-8') as file:
    file_contents = file.read()
print(file_contents)
CHARACTER_DATA = {
    "空": [0, 0, 1, 0, 1, 0, 127, 254, 66, 66, 66, 66, 6, 64, 12, 66, 56, 126, 32, 0, 63, 252, 1, 0, 1, 0, 1, 0, 1, 0, 127, 252],
    "氣": [0, 0, 8, 0, 31, 254, 16, 0, 47, 248, 64, 0, 63, 240, 2, 144, 50, 208, 26, 144, 63, 240, 7, 16, 10, 138, 50, 106, 66, 6, 0, 0],
    "品": [0, 0, 0, 0, 15, 240, 8, 16, 8, 16, 8, 16, 8, 16, 15, 240, 0, 0, 126, 126, 66, 66, 66, 66, 66, 66, 66, 66, 126, 126, 66, 66],
    "質": [0, 0, 2, 4, 60, 122, 32, 64, 63, 126, 36, 136, 101, 136, 95, 248, 16, 8, 31, 248, 16, 8, 31, 248, 16, 8, 31, 248, 12, 56, 112, 7],
    "不": [0, 0, 0, 0, 0, 0, 127, 252, 1, 128, 1, 0, 3, 0, 7, 96, 13, 24, 25, 12, 113, 6, 193, 2, 1, 0, 1, 0, 1, 0, 1, 0],
    "好": [0, 0, 17, 252, 16, 12, 32, 8, 126, 16, 50, 32, 50, 32, 37, 254, 100, 32, 116, 32, 92, 32, 12, 32, 22, 32, 50, 32, 65, 224, 0, 0],
    "佳": [0, 0, 8, 64, 8, 64, 19, 252, 16, 64, 48, 64, 119, 252, 80, 0, 16, 64, 16, 64, 23, 252, 16, 64, 16, 64, 16, 64, 31, 254, 0, 0],
    "良": [0, 0, 1, 0, 1, 0, 31, 248, 16, 8, 16, 8, 31, 248, 16, 8, 16, 8, 31, 248, 17, 4, 17, 152, 16, 224, 16, 96, 31, 56, 120, 14],
    "差": [0, 0, 24, 16, 12, 48, 127, 254, 1, 0, 63, 248, 1, 0, 1, 0, 127, 252, 8, 0, 31, 252, 16, 192, 48, 192, 32, 64, 207, 254, 0, 0],
}
Upload the "characters.py"
Display Chinese Characters
ESP32 OLED SSD1306
By wschen
ESP32 OLED SSD1306
Discover the fascinating world of ESP32 OLED SSD1306! Learn how to connect ESP32 to OLED ssd1306, explore different code examples, and even create your own Chinese font file. Join us to unlock the potential of this amazing technology.


